

Aviscall01
-
Posts
7 -
Joined
-
Last visited
-
Days Won
1 -
Donations
0.00 GBP
Content Type
Profiles
Bug Tracker
Wiki
Release Notes
Forums
Downloads
Blogs
Events
Wiki Article Comments posted by Aviscall01
-
-
ADDON
1. HOWTO INSTALL UBUNTU 22.04 ON WINDOWS IN VIRTUALBOX:
If you would like to run your server in a virtual box, you can install VirtualBox from Oracle on your PC. Here is a guide and additional settings you can use to make life easier.
_______________________________________________________________________________________________________________________________
1. prepare folder structure
-
create folders
- D:/DEV/VM/Ubuntu
- D:/DEV/Software (download all needed software here)
- D:/DEV/Programs
- D:/DEV/GIT (if you are interesste in assisting the community in development)
-
Download software
- VirtualBox: https://www.virtualbox.org/
- Install software by follwoing the installer instructions, you can install it to Folder: D:/DEV/Programs/VirtualBox
- Accept all options
- After installation start VirtualBox
2. Download Ubuntu Server Image
-
Download the server image from: http://de.archive.ubuntu.com/ubuntu-releases/jammy/
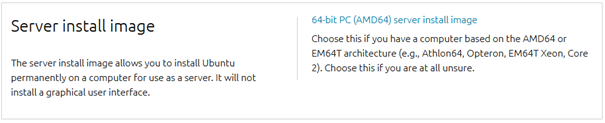
- select "server install image", not the desktop one
3. Create new server
-
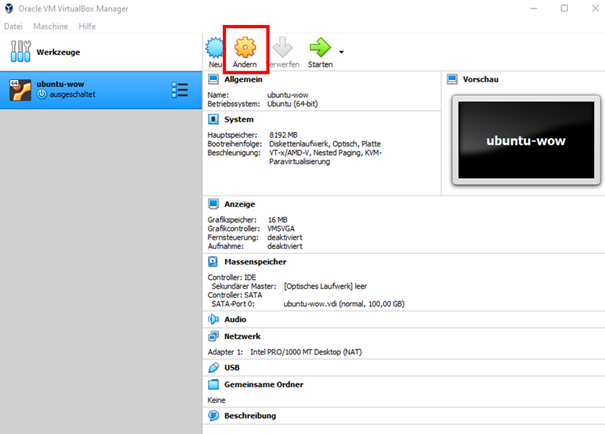
Open VirtualBox and "Create" new server
- Give your server a nice name, like: ubuntu-wow
- select a path for the virtual machine, e.g. D:/DEV/VM/Ubuntu
- select type Linux and Version Ubuntu (64-bit)
- Afterwards you have to reserve some RAM memory for your machine (you can change it later, if the machine is shut down). I would recommend 4 GB or 4096 MB.
-
In next step you are requested to create a virtual drive.
- select "create hard drive" and click on "create"
- select VDI and click on "Next"
- select "dynamic allocation" (this will just use the space from your PC, if really needed.)
- select the maximum size you would like to use, I recommend 40 GB for one server. If you plan to install others in parallel, then assign more space.
- After creation, click on "Edit"
-
You can change settings.
- I recommend to set CPUs to minimum 2 or more.
4. Start VM
- You will be requested to select the ISO file for the installer. Select the ISO file from Ubuntu we downlaoded just before.
- Maybe you have to "Add" the ISO medium first.
- If you selected the file, click "Start"
- Follwo the instructions on the screen.
-
Usually you can just go through the installer and accept all default values.
- You will be requested to insert YourName, Server Name and credentials for your user (e.g. mangos and >password>)
- After clicking on "Done" he installer will run, then you can "Reboot Now" the server and login with your user "mangos"
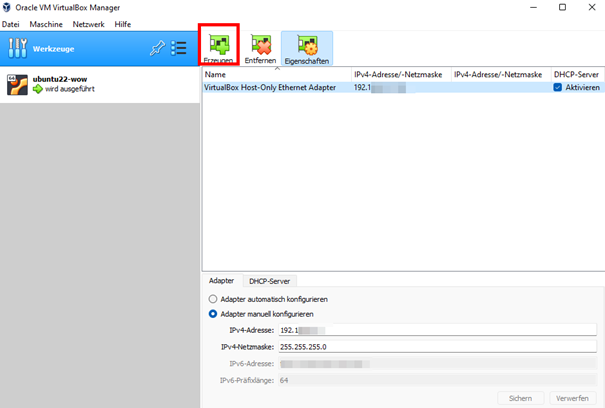
5. Usually VirtualBox is creating by default an "Host-Only Adapter", if not you can add it and activate DHCP-Server:

- Afterwards restart the VM again. Then you should get an IP from your new virtual network.
2. HOWTO ACCESS SERVER WITH SFTP:
1. You can access your VM via sFTP to upload data, like gamedata:
- Open the VM and login with "Mangos", install the sFTP server:
sudo apt-get install vsftpd
- Configure the follwoing changes into sFTP:
sudo nano /etc/vsftpd.conf
-
- change: listen=YES
- uncomment: write_enable=YES
- if you want, add root rights to gamedata folder by adding the line: local_root=/home/mangos/mangos/zero/gamedata/
- Restart sFTP:
service vsftpd restart
2. Now you can connect to your VM wih any sFTP client, e.g. like WinSCP.
3. HOWTO ACCESS DB FROM PC:
If you want to access your DB on the server from your PC, you can use HeidiSQL on your client PC to access the database.
To do so, you have to configure the DB to listen to external calls and you maybe need an additional user.
1. Edit mariadb.conf
sudo nano /etc/mysql/mariadb.conf.d/50-server.cnf
-
comment out the line: #bind-address=127.0.0.1
- otherwise your DB will just listen to the localhost on 127.0.0.1
2. create new remote user in DB:
mysql -u mangos -p<password>
then execute SQLs:
GRANT all privileges ON *.* TO ‘remoteMangos’@’xxx.xxx.xxx.%’ IDENTIFIED BY ‘<password>’ WITH GRANT OPTION;
replace IP with your client IP (or if you use Host-Only Adapter with lowest IP from virtual network).
3. Login with HeidiSQL and user to your DB on the Server.
4. HOWTO BACKUP YOUR DB TO HOST:
1. Create a shared folder to save backup file on your host and not within the VM, if it crashes you can rebuild your DB with such backup. Therefor open VirtualBox and select "Edit" for the VM.
2. Select Shared Folder and click on "Add" icon:
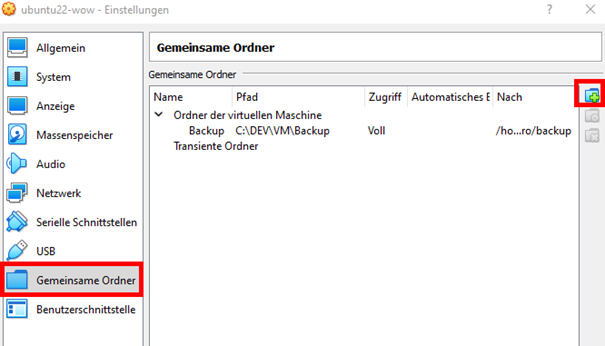
3. Set the path on host and on VM to be added (folder shouldn't exists in VM). You can make it permanent and attach automatically:
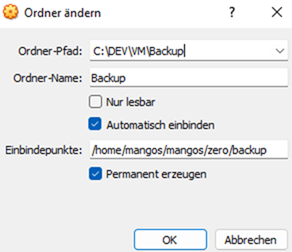
4. Reboot the VM or start it and folder should appear. For reboot just execute the command in VM:
reboot
4.1 If folder is not added you can mount it manually by executing:
sudo mount -t vboxsf <FolderName in VBox: Backup> <path where to mount it>
4.2 If folder is not automatically mounted on reboot, you can also edit the fstab.
sudo nano /etc/fstab
Just add the follwoing line at the end of the file:

Now, it should work after reboot.
5. To create a cronjob to automatically backup your DB, create a folder to store your script and edit scipt file:
mkdir /home/mangos/mangos/zero/script
nano /home/mangos/mangos/zero/script/backup_script.sh
6. Insert backup script into file, you can edit it if needed, accordingly to your folder structure, but it should work, if you followed instructions above:
The script will create a dump of your DBs and zip them, afterwards it will copy data to backup folder, which is accessible by your host system. Also after 5 days the old file will be deleted. Maybe you have to install zip on your system:
sudo apt install zip
Script:
Spoiler#!/bin/sh
# Archive & File variables
BASEDIR=$(dirname "$(realpath $0)")
BACKUP_FOLDER=/home/mangos/mangos/zero/backup/
ARCHIVE=WoWBackupDB`date +"%F"`
OLDARCHIVE=WoWBackupDB`date --date '-5 days' +"%F"`
FILE=Realmd_`date +"%F"`
FILE0=Characters-ZERO_`date +"%F"`
FILEW0=World-ZERO_`date +"%F"`# MariaDB variables
DBSERVER=127.0.0.1
REALM_DATABASE=mangos_auth
CHAR_ZERO_DB=mangos_character0
WORLD_ZERO_DB=mangos_world0USER=mangos
PASS=<password for DB user># Remove previous .zip files if multiple daily backups are being ran
echo "Checking and removing as needed old .zip files locally."
rm -f $BACKUP_FOLDER$ARCHIVE.zip
rm -f $BACKUP_FOLDER$OLDARCHIVE.zip# Dump MariaDB database in .sql files into /root
echo "Dumping .sql files to /root"
mysqldump --opt --user=${USER} --password=${PASS} ${REALM_DATABASE} > $BASEDIR/${FILE}.sql
mysqldump --opt --user=${USER} --password=${PASS} ${CHAR_ZERO_DB} > $BASEDIR/${FILE0}.sql
mysqldump --opt --user=${USER} --password=${PASS} ${WORLD_ZERO_DB} > $BASEDIR/${FILEW0}.sql# Zip dumped MariaDB .sql files
echo "Zipping dumped .sql files."
zip $BASEDIR/$ARCHIVE.zip $BASEDIR/$FILE.sql $BASEDIR/$FILE0.sql $BASEDIR/$FILEW0.sql# Show the user the result
echo "${ARCHIVE}.zip was created!"# Move the file to backup folder
echo "Move ZIP file to backup folder"
rm $BACKUP_FOLDER$OLDARCHIVE.zip
mv $BASEDIR/$ARCHIVE.zip $BACKUP_FOLDER$ARCHIVE.zip# Tidy up files in the /root folder
rm -f $BASEDIR/*.sql7. Save script and make it executable with command:
chmod a+x /home/mangos/mangos/zero/script/backup_script.sh
8. Now, we can create a crontab for your user mangos:
cd ~ && crontab -e
9. If no crontab for user exists, you will be asked to select the default editor, you can select nano
10. Then you can add the entry to start our script:
Add the SHELL and PATH variable for crontab and the call for our script (the example will create a backup every hour and writes a log file for it per day):
* */1 * * * /home/mangos/mangos/zero/script/backup_script.sh >> /home/mangos/mangos/zero/logs/backup_`date +\%Y-\%m-\%d`.log 2>&1
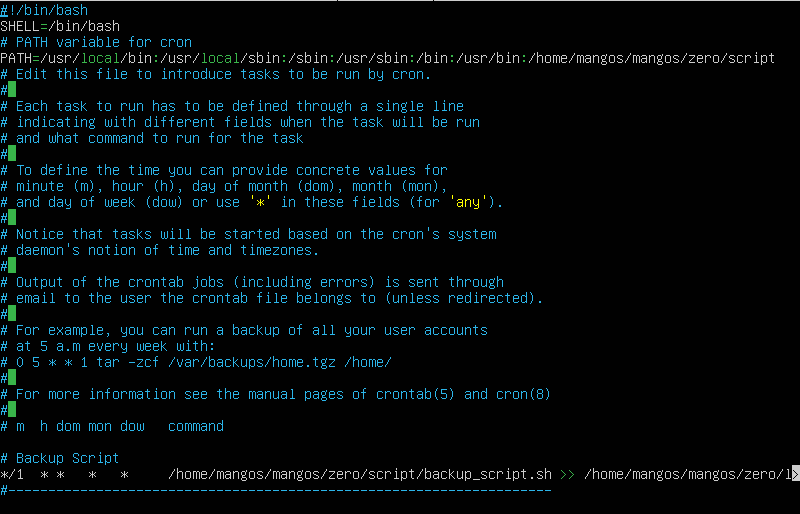
NOTE: At the end you always have to add a comment line or an empty line with carriage return.
11. Save the crontab to file /home/mangos/.crontab-mangos
12. Usually, if you edit the crontab with crontab -e, it will automatically register your user crontab, if not you can register the file manually by executing:
crontab -u mangos /home/mangos/.crontab-mangos
Done, you should find every hour an updated backup file on your host in the Backup folder.
-
 1
1
-
create folders
-
The wowadmin.sh script has two small bugs:
startWorld() should be:
startWorld()
{
    if [ "$(screen -ls | grep $WSRV_SCR)" ]
    then
        echo $WSRV_BIN is already running
    else
        cd $WPATH
        screen -AmdS $WSRV_SCR $WPATH/$WSRV_BIN $DEBUG
        echo $WSRV_BIN is alive
    fi
}
and startAuth() should be:
startAuth()
{
    if [ "$(screen -ls | grep $ASRV_BIN)" ]
    then
        echo $ASRV_BIN is already running
    else
        cd $APATH
        screen -AmdS $ASRV_BIN $APATH/$ASRV_BIN
        echo $ASRV_BIN is alive
    fi
}
Contact Us
You can also email us at [email protected]
Privacy Policy | Terms & Conditions
Installing MaNGOS on Ubuntu Server 22.04
in Linux
Posted · Edited by Aviscall01
KNOWN ISSUES
Nothing is perfect, so, sometimes some errors can occure. I collected my errors I was facing during running the current version of Mangos Zero in Ubuntu 22.04.
_______________________________________________________________________________________________________________________________
1. NO IP ASSIGNED TO MY INTERFACE FROM (HOST-ONLY ADAPTER IN VIRTUAL BOX)
If you just see the Host-Obly Adapter, while executing the following command, but only IPv6 or no IP is assigned:
Try to set a static Ip out of the range of your Host-Only virtual network from VirtualBox:
sudo netplan apply2. ERROR DURING MAKE PROCESS LIKE "TileAssembler"
This might be caused due to an older compiler needed for the script. You need to downgrade the compiler. First install older compiler:
You can change the priority anytime with command:
Try using version 10!
3. WARDEN OR AIPLAYERBOT ERROR OR IF YOU ARE KICKED DIRECTLY AFTER LOGIN FROM THE GAME CLIENT
The issue might be with wrong OpenSSL version installed (Ubuntu comes by default with OpenSSL 3.0.2, but client needs OpenSSL 1.1.1). So we have to downgrade the OpenSSL:
You can check if changes on $PATH have been applied with:
and, if new OpenSSL is used:
3.1 If Login still failes due to Warden or AI PlayerBot after downgrade of OpenSSL, you maybe have to disable it.
Just change the mangosd.conf under "~/mangos/zero/etc/" accordingly and set WARDEN SUPPORT to 0. And disable AI PlayerBot if needed.
4. FAILED TO ATTACH THE NETWORK IN VIRTUALBOX
Sometimes after a windows update, it might happen that network can't be attached, while starting Virtual Machine. An error like this might pop-up:
Then try to deactivate and activate the ethernet adapter under windows.