Jump to content
  • We are looking for staff for the Wiki area!
    If interested please
    click here and select "Documentation Team"

  • Installing MaNGOS on Ubuntu Server 22.04


    Aviscall01

    Hi everyone,

    I recently installed MaNGOS(Zero) on Ubuntu 22.04 and thought it would be nice to share my step-by-step guide with you. You can use this guide for all cores, just replace GIT repository URL accordingly.

    _______________________________________________________________________________________________________________________________

    PREREQUISITES

    You should have a running server with Ubuntu Server 22.04 operating system.

    Before starting with the guide you should update the OS:

    sudo apt update && apt upgrade

    Upgrading to higher release of Ubuntu Server is on own risk. You should backup your DB before!

    Also you will need an installation of the game client with the addons installed for which you would like to create the server for.

    _______________________________________________________________________________________________________________________________

    PREPARATION

    1. Create system user to be used for installation, if not already available. We will use in the guide a specific user named "mangos":

    adduser mangos

    1.1 You can add root rights to the user, otherwise you need to execute some parts of the guide with root:

    usermod -aG sudo mangos

    2. Install usefull tools for this guide

    MaNGOS requires some libraries to be built and to run properly. We also need some programs to run further commands or simply to handle some scripts which are in the repo (e.g : python scripts).

    sudo apt install git make cmake libssl-dev libbz2-dev build-essential mariadb-server mariadb-client default-libmysqlclient-dev libace-dev python2 net-tools screen gdb

    3. Create folder structure

    You can structure your fodlers as you like, you just have to take care to change the folder names accordingly in the scripts below. I try to seperate the different components and wanted to have the option to install different cores in parallel.

    You can check your user name with the command:

    whoami

    If you are using user "mangos", go to the home directory.

    cd ~

    Then create folders:

    mkdir ~/mangos
    mkdir ~/mangos/zero
    mkdir ~/mangos/zero/db
    mkdir ~/mangos/zero/bin
    mkdir ~/mangos/zero/gamedata
    mkdir ~/mangos/zero/logs
    

    4. prepare database

    Login to the MariaDB with:

    sudo mysql

    4.1 create a new user for mangos

    Execute the follwoing create statement in the DB, replace <password> with a secret password which you can remember. Also grant the user with all required DB rights (very powerful rights, so don't share this user with anybody):

    CREATE USER 'mangos'@'localhost' IDENTIFIED BY '<password>';
    GRANT ALL PRIVILEGES ON *.* TO 'mangos'@'localhost' WITH GRANT OPTION; 
    exit; 

    Afterwards you are able to login to MariaDB with new user:

    mysql -u mangos -p<password>

    _______________________________________________________________________________________________________________________________

    INSTALL DATABASE

    1. Go to the db folder and download the database from the GIT repository. If you want to install a different version, exchange the url accordingly:

    cd ~/mangos/zero/db
    git clone https://github.com/mangoszero/database.git --recursive

    2. This will create a new sub-folder database and downloads all required tools and scripts to install the database for the Mangos core selected. Go to new sub-folder and start installation script:

    cd ~/mangos/zero/db/database
    bash ./InstallDatabase.sh

    You will see the following screen:

    image.png.cf96fd9a353bdc3f55c05d95b0499857.png

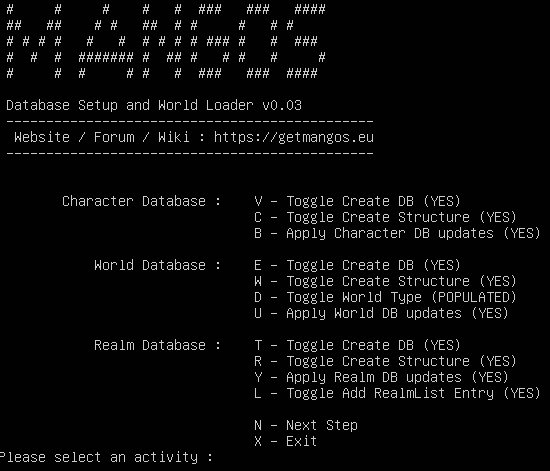
    3. Press "N" to start process. It should automatically identify your MariaDB installed on your server.

    3.1 In general you can accept the default values in brackets, but following information needs to be set correctly:

    • The user name for MariaDB: mangos
    • The password for the user to allow scritp to create all required tables: <password>
    • Set the names for DB schemas (it's recommended to use separate schemas for characters and world for each core, so adjsut the numbering if needed)
      • Character DB: mangos_character0 (0 - Classic; 1 - TBC; 2 - WOTLK; ...)
      • World DB: mangos_world0
      • Realm DB: mangos_auth (Note: you just need one Realm DB, even if you run multiple cores on your server!)

    After providing all informaion, the script will install all databases and tables.

    3.2 To configure the database, get at first your IP address by executing the command:

    ifconfig

    Note down your IP and open MariaDB again:

    mysql -u mangos -p<password>

    You can check the realmlist with the following SQL, note down the proper ID of the server you want to configure:

    select * from realmlist;

    Update the realmlist with proper name and IP address, use the right ID:

    UPDATE realmlist SET name = “<Your Server-Name>” WHERE id = <ID>;
    UPDATE realmlist SET address = “<Server-IP address>” WHERE id = <ID>;

    The database is now ready!

    _______________________________________________________________________________________________________________________________

    BUILD MANGOS

    Next we will install the server related to the Mangos core DB you installed before.

    1. Go to the core version folder and download the server from GIT repository (don't forget to change the URL to appropriate core version, if needed). It creates a new sub-fodler "server" and stores all data in it:

    cd ~/mangos/zero/
    git clone https://github.com/mangoszero/server.git --recursive

    2. Build the core

    After download, we have to build the core by executing e.g. the following command:

    cmake -S ~/mangos/zero/server/ -B ~/mangos/zero/build/ -DBUILD_MANGOSD=1 -DBUILD_REALMD=1 -DBUILD_TOOLS=1 -DUSE_STORMLIB=1 -DSCRIPT_LIB_ELUNA=1 -DSCRIPT_LIB_SD3=1 -DPLAYERBOTS=1 -DPCH=1

    3. The script creates all necessary build files and stores then in the sub-folder "build". If it's done we can switch to the folder and build/install mangos (a server with minimum 2 cores/cpus is recommended):

    make -j<# of CPUs assigned to your server>
    make -j<# of CPUs assigned to your server> install

    4. Copy server files to our "bin" folder after the install scripts finished successfully:

    cd ~/mangos/zero/build/install/bin
    cp mangosd ~/mangos/zero/bin/ && cp realmd ~/mangos/zero/bin/

    5. Copy game extractor files to our "gamedata" folder:

    cp ./tools/*-extractor ~/mangos/zero/gamedata/
    cp ./tools/*.sh ~/mangos/zero/gamedata/
    cp ./tools/offmesh.txt ~/mangos/zero/gamedata/

    _______________________________________________________________________________________________________________________________

    EXTRACT GAMEDATA

    You will require an iinstallation of the game client on your local machine and a sFTP connection to your server to copy whole game fodler to the server. Safe the client in folder: ~/mangos/zero/gamedata/! If this is done you can continue.

    1. Go to "gamedata" folder and change executable rights to extractor script and make all files read-/writeable:

    cd ~/mangos/zero/gamedata
    chmod -R a+w ~/mangos/zero/gamedata
    chmod a+x ExtractResources.sh

    2. Execute the Extractor Script and follwo the onscreen instructions (minimum of 4 GB RAM is required, recommended are 8 GB):

    • extract everything (dbc, maps, mmaps, vmaps)
    • choose all CPUs available on your server to extract MMaps (1-4)
    • extract MMaps without delay

    After starting the process it will take a lot of time to complete. If the message "Finished creating MoveMaps" appears it's done. Check that no errors occured!

    3. Clean up unnecessary files, you can delete all folders and files from "gamedata" folder except:

    • dbc
    • maps
    • mmaps
    • vmaps

    _______________________________________________________________________________________________________________________________

    CONFIGURE SERVER

    1. Go to main server folder and copy server config files:

    cd ~/mangos/zero
    cp -R ~/mangos/zero/build/etc ./
    cd etc

    2. In the folder "etc" you find now all config files, copy the default files for editing and use by the server:

    cp ahbot.conf.dist ahbot.conf
    cp mangosd.conf.dist mangosd.conf
    cp realmd.conf.dist realmd.conf
    cp aiplayerbot.conf.dist aiplayerbot.conf

    3. You should edit all files according to your needs, especially the db connection information. For comfortable editing use "nano":

    nano <filename>

    4. Start script for services to run the server:

    cd ~/mangos/zero/bin
    nano wowadmin.sh

    Insert into the file the following script and save (replace the "/path/to/your/realmd" and "mangosd" to proper path, if you changed them:

    Spoiler

    #!/bin/bash

    THIS_FULLPATH=$(cd `dirname "${BASH_SOURCE[0]}"` && pwd -P)/`basename "${BASH_SOURCE[0]}"`

    THIS_FOLDERPATH=$(cd `dirname "${BASH_SOURCE[0]}"` && pwd -P)


    APATH=/home/mangos/mangos/zero/bin/realmd

    WPATH=/home/mangos/mangos/zero/bin/mangosd

    ASRV_BIN=realmd         #This usually doesnt change. TrinityCore: authserver  MaNGOS: realmd  ArcEmu: whocares?

    WSRV_BIN_ORG=mangosd    #This usually doesnt change. TrinityCore: worldserver MaNGOS: mangosd ArcEmu: whocares?

    WSRV_BIN=mangosd

    WSRV_SCR=mangosd


    echo "run" > gdbcommands

    echo "shell echo -e \"\nCRASHLOG BEGIN\n\"" >> gdbcommands

    echo "info program" >> gdbcommands

    echo "shell echo -e \"\nBACKTRACE\n\"" >> gdbcommands

    echo "bt" >> gdbcommands

    echo "shell echo -e \"\nBACKTRACE FULL\n\"" >> gdbcommands

    echo "bt full" >> gdbcommands

    echo "shell echo -e \"\nTHREADS\n\"" >> gdbcommands

    echo "info threads" >> gdbcommands

    echo "shell echo -e \"\nTHREADS BACKTRACE\n\"" >> gdbcommands

    echo "thread apply all bt full" >> gdbcommands


    DEBUG=false


    #WORLD FUNCTIONS

    startWorld()

    {

        if [ "$(screen -ls | grep $WSRV_SCR)" ]

        then

            echo $WSRV_BIN is already running

        else

            cd $WPATH

            screen -AmdS $WSRV_SCR $WPATH/$WSRV_BIN $DEBUG

            echo $WSRV_BIN is alive

        fi

    }


    restartWorld()

    {

        screen -S $WSRV_SCR -X stuff "saveall$(printf \\r)"

        echo saved all characters, and server restart initialized

        screen -S $WSRV_SCR -X stuff "server restart 5$(printf \\r)"

    }


    stopWorld()

    {

        screen -S $WSRV_SCR -X stuff "saveall

        "

        echo saveall sent, waiting 5 seconds to kill $WSRV_BIN

        sleep 5

        screen -S $WSRV_SCR -X kill &>/dev/null

        echo $WSRV_BIN is dead

    }


    monitorWorld()

    {

        echo press ctrl+a+d to detach from the server without shutting it down

        sleep 5

        screen -r $WSRV_SCR

    }

    #AUTH FUNCTIONS

    startAuth()

    {

        if [ "$(screen -ls | grep $ASRV_BIN)" ]

        then

            echo $ASRV_BIN is already running

        else

            cd $APATH

            screen -AmdS $ASRV_BIN $APATH/$ASRV_BIN

            echo $ASRV_BIN is alive

        fi

    }


    stopAuth()

    {

        screen -S $ASRV_BIN -X kill &>/dev/null

        echo $ASRV_BIN is dead

    }


    restartAuth()

    {

        stopAuth

        startAuth

        echo $ASRV_BIN restarted

    }


    monitorAuth()

    {

        echo press ctrl+a+d to detach from the server without shutting it down

        sleep 5

        screen -r $ASRV_BIN

    }


    #FUNCTION SELECTION

    case "$1" in

        $WSRV_BIN )

        if [ "$2" == "true" ]

        then

            while x=1;

            do

                gdb $WPATH/$WSRV_BIN --batch -x gdbcommands | tee current

                NOW=$(date +"%s-%d-%m-%Y")

                mkdir -p $THIS_FOLDERPATH/crashes

                mv current $THIS_FOLDERPATH/crashes/$NOW.log &>/dev/null

                killall -9 $WSRV_BIN

                echo $NOW $WSRV_BIN stopped, restarting! | tee -a $THIS_FULLPATH.log

                echo crashlog available at: $THIS_FOLDERPATH/crashes/$NOW.log

                sleep 1

            done

        else

            while x=1;

            do

                ./$WSRV_BIN

                NOW=$(date +"%s-%d-%m-%Y")

                echo $NOW $WSRV_BIN stopped, restarting! | tee -a $THIS_FULLPATH.log

                sleep 1

            done

        fi

        ;;

        $ASRV_BIN )

            while x=1;

            do

                ./$ASRV_BIN

                NOW=$(date +"%s-%d-%m-%Y")

                echo $NOW $ASRV_BIN stopped, restarting! | tee -a $THIS_FULLPATH.log

                sleep 1

            done

        ;;

        "wstart" )

        startWorld

        ;;

        "wdstart" )

        DEBUG=true

        startWorld

        ;;

        "wrestart" )

        restartWorld

        ;;

        "wstop" )

        stopWorld

        ;;

        "wmonitor" )

        monitorWorld

        ;;


        "astart" )

        startAuth

        ;;

        "arestart" )

        restartAuth

        ;;

        "astop" )

        stopAuth

        ;;

        "amonitor" )

        monitorAuth

        ;;


        "start" )

        startWorld

        startAuth

        ;;

        "stop" )

        stopWorld

        stopAuth

        ;;

        "restart" )

        restartWorld

        restartAuth

        ;;

        * )

        echo Your argument is invalid

        echo "usage: start | stop | restart | wstart | wdstart | wrestart | wstop | wmonitor | astart | arestart | astop | amonitor"

        exit 1

        ;;

    esac

    5. Start the server with command:

    bash wowadmin.sh start

    _______________________________________________________________________________________________________________________________

    PLAY GAME

    1. update your realmlist.wtf in your game client folder.

    • you can find the file in your %WoWDir%\realmlist.wtf
    • Set the realmlist to your new IP (you should save the old realmlist.wtf as backup):
    set realmlist <IP of your server>

    2. The standard users are accessible directly, if server is up and running:

    • User: PLAYER - Password: PLAYER
    • User: ADMINISTRATOR - Password: ADMINISTRATOR
    • User: GAMEMASTER - Password: GAMEMASTER
    • User: MODERATOR - Password: MODERATOR

    3. To create a new account, go to your server and execte command:

    cd ~/mangos/zero/bin
    bash wowadmin.sh wmonitor

    In the world monitor console, enter the following commands:

    account create <account name> <password>
    account set addon <account name> #

    replace <account name> with new name and set a proper password, also grant the addons to be used for the user by changing # to a proper number: 0 - Classic; 1 - TBC; 2 - WOTLK; ...)

    To exit the monito, press CTRL +a +d at the same time.


    User Feedback

    Recommended Comments

    ADDON

    1. HOWTO INSTALL UBUNTU 22.04 ON WINDOWS IN VIRTUALBOX:

    If you would like to run your server in a virtual box, you can install VirtualBox from Oracle on your PC. Here is a guide and additional settings you can use to make life easier.

    _______________________________________________________________________________________________________________________________

    1. prepare folder structure

    • create folders
      • D:/DEV/VM/Ubuntu
      • D:/DEV/Software (download all needed software here)
      • D:/DEV/Programs
      • D:/DEV/GIT (if you are interesste in assisting the community in development)
    • Download software
      • VirtualBox: https://www.virtualbox.org/
      • Install software by follwoing the installer instructions, you can install it to Folder: D:/DEV/Programs/VirtualBox
      • Accept all options
      • After installation start VirtualBox

    2. Download Ubuntu Server Image

    image.png.66aeec3fecb863b60b16545f48f05bcb.png

    3. Create new server

    • Open VirtualBox and "Create" new server
      • Give your server a nice name, like: ubuntu-wow
      • select a path for the virtual machine, e.g. D:/DEV/VM/Ubuntu
      • select type Linux and Version Ubuntu (64-bit)
    • Afterwards you have to reserve some RAM memory for your machine (you can change it later, if the machine is shut down). I would recommend 4 GB or 4096 MB.
    • In next step you are requested to create a virtual drive.
      • select "create hard drive" and click on "create"
      • select VDI and click on "Next"
      • select "dynamic allocation" (this will just use the space from your PC, if really needed.)
      • select the maximum size you would like to use, I recommend 40 GB for one server. If you plan to install others in parallel, then assign more space.
    • After creation, click on "Edit"

    image.png.330a97741e35d294a34af70b06ade59e.png

    • You can change settings.
      • I recommend to set CPUs to minimum 2 or more.

    4. Start VM

    • You will be requested to select the ISO file for the installer. Select the ISO file from Ubuntu we downlaoded just before.
    • Maybe you have to "Add" the ISO medium first.
    • If you selected the file, click "Start"
    • Follwo the instructions on the screen.
    • Usually you can just go through the installer and accept all default values.
      • You will be requested to insert YourName, Server Name and credentials for your user (e.g. mangos and >password>)
    • After clicking on "Done" he installer will run, then you can "Reboot Now" the server and login with your user "mangos"

    5. Usually VirtualBox is creating by default an "Host-Only Adapter", if not you can add it and activate DHCP-Server:

    image.png.8e98a9514444c87d4520784bc478982f.png

    • Afterwards restart the VM again. Then you should get an IP from your new virtual network.

    2. HOWTO ACCESS SERVER WITH SFTP:

    1. You can access your VM via sFTP to upload data, like gamedata:

    • Open the VM and login with "Mangos", install the sFTP server:
    sudo apt-get install vsftpd
    • Configure the follwoing changes into sFTP:
    sudo nano /etc/vsftpd.conf
    •  
      • change: listen=YES
      • uncomment: write_enable=YES
      • if you want, add root rights to gamedata folder by adding the line: local_root=/home/mangos/mangos/zero/gamedata/
    • Restart sFTP:
    service vsftpd restart

    2. Now you can connect to your VM wih any sFTP client, e.g. like WinSCP.

    image.png

    3. HOWTO ACCESS DB FROM PC:

    If you want to access your DB on the server from your PC, you can use HeidiSQL on your client PC to access the database.

    To do so, you have to configure the DB to listen to external calls and you maybe need an additional user.

    1. Edit mariadb.conf

    sudo nano /etc/mysql/mariadb.conf.d/50-server.cnf
    • comment out the line: #bind-address=127.0.0.1
      • otherwise your DB will just listen to the localhost on 127.0.0.1

    2. create new remote user in DB:

    mysql -u mangos -p<password>

    then execute SQLs:

    GRANT all privileges ON *.* TO remoteMangos’@’xxx.xxx.xxx.%’ IDENTIFIED BY ‘<password>’ WITH GRANT OPTION;

    replace IP with your client IP (or if you use Host-Only Adapter with lowest IP from virtual network).

    3. Login with HeidiSQL and user to your DB on the Server.

    4. HOWTO BACKUP YOUR DB TO HOST:

    1. Create a shared folder to save backup file on your host and not within the VM, if it crashes you can rebuild your DB with such backup. Therefor open VirtualBox and select "Edit" for the VM.

    2. Select Shared Folder and click on "Add" icon:

    image.png.db88dd7a95cf2927b17b92e38ed3f73e.png

    3. Set the path on host and on VM to be added (folder shouldn't exists in VM). You can make it permanent and attach automatically:

    image.png.6ddb320f9c32fc6b196c131854dc37e0.png

    4. Reboot the VM or start it and folder should appear. For reboot just execute the command in VM:

    reboot

    4.1 If folder is not added you can mount it manually by executing:

    sudo mount -t vboxsf <FolderName in VBox: Backup> <path where to mount it>

    4.2 If folder is not automatically mounted on reboot, you can also edit the fstab.

    sudo nano /etc/fstab

    Just add the follwoing line at the end of the file:

    image.png.0f6678d37f7f0d9737cc7fdad25120aa.png

    Now, it should work after reboot.

    5. To create a cronjob to automatically backup your DB, create a folder to store your script and edit scipt file:

    mkdir /home/mangos/mangos/zero/script
    nano /home/mangos/mangos/zero/script/backup_script.sh

    6. Insert backup script into file, you can edit it if needed, accordingly to your folder structure, but it should work, if you followed instructions above:

    The script will create a dump of your DBs and zip them, afterwards it will copy data to backup folder, which is accessible by your host system. Also after 5 days the old file will be deleted. Maybe you have to install zip on your system:

    sudo apt install zip

    Script:

    Spoiler

    #!/bin/sh

    # Archive & File variables
    BASEDIR=$(dirname "$(realpath $0)")
    BACKUP_FOLDER=/home/mangos/mangos/zero/backup/
    ARCHIVE=WoWBackupDB`date +"%F"`
    OLDARCHIVE=WoWBackupDB`date --date '-5 days' +"%F"`
    FILE=Realmd_`date +"%F"`
    FILE0=Characters-ZERO_`date +"%F"`
    FILEW0=World-ZERO_`date +"%F"`

    # MariaDB variables
    DBSERVER=127.0.0.1
    REALM_DATABASE=mangos_auth
    CHAR_ZERO_DB=mangos_character0
    WORLD_ZERO_DB=mangos_world0

    USER=mangos
    PASS=<password for DB user>

    # Remove previous .zip files if multiple daily backups are being ran
    echo "Checking and removing as needed old .zip files locally."
    rm -f $BACKUP_FOLDER$ARCHIVE.zip
    rm -f $BACKUP_FOLDER$OLDARCHIVE.zip

    # Dump MariaDB database in .sql files into /root
    echo "Dumping .sql files to /root"
    mysqldump --opt --user=${USER} --password=${PASS} ${REALM_DATABASE} > $BASEDIR/${FILE}.sql
    mysqldump --opt --user=${USER} --password=${PASS} ${CHAR_ZERO_DB} > $BASEDIR/${FILE0}.sql
    mysqldump --opt --user=${USER} --password=${PASS} ${WORLD_ZERO_DB} > $BASEDIR/${FILEW0}.sql

    # Zip dumped MariaDB .sql files
    echo "Zipping dumped .sql files."
    zip $BASEDIR/$ARCHIVE.zip $BASEDIR/$FILE.sql $BASEDIR/$FILE0.sql $BASEDIR/$FILEW0.sql

    # Show the user the result
    echo "${ARCHIVE}.zip was created!"

    # Move the file to backup folder
    echo "Move ZIP file to backup folder"
    rm $BACKUP_FOLDER$OLDARCHIVE.zip
    mv $BASEDIR/$ARCHIVE.zip $BACKUP_FOLDER$ARCHIVE.zip

    # Tidy up files in the /root folder
    rm -f $BASEDIR/*.sql

    7. Save script and make it executable with command:

    chmod a+x /home/mangos/mangos/zero/script/backup_script.sh

    8. Now, we can create a crontab for your user mangos:

    cd ~ && crontab -e

    9. If no crontab for user exists, you will be asked to select the default editor, you can select nano

    10. Then you can add the entry to start our script:

    Add the SHELL and PATH variable for crontab and the call for our script (the example will create a backup every hour and writes a log file for it per day):

    * */1 * * * /home/mangos/mangos/zero/script/backup_script.sh >> /home/mangos/mangos/zero/logs/backup_`date +\%Y-\%m-\%d`.log 2>&1

    image.png.983057353603a222951b3ab56f78bb2f.png

    NOTE: At the end you always have to add a comment line or an empty line with carriage return.

    11. Save the crontab to file /home/mangos/.crontab-mangos

    12. Usually, if you edit the crontab with crontab -e, it will automatically register your user crontab, if not you can register the file manually by executing:

    crontab -u mangos /home/mangos/.crontab-mangos

    Done, you should find every hour an updated backup file on your host in the Backup folder.

    Edited by Aviscall01
    • Like 1
    Link to comment
    Share on other sites

    KNOWN ISSUES

    Nothing is perfect, so, sometimes some errors can occure. I collected my errors I was facing during running the current version of Mangos Zero in Ubuntu 22.04.

    _______________________________________________________________________________________________________________________________

    1. NO IP ASSIGNED TO MY INTERFACE FROM (HOST-ONLY ADAPTER IN VIRTUAL BOX)

    If you just see the Host-Obly Adapter, while executing the following command, but only IPv6 or no IP is assigned:

    ifconfig -a

    image.png.09c846baa41b86e84a8229c71699f586.png

    Try to set a static Ip out of the range of your Host-Only virtual network from VirtualBox:

    • Edit the netplan
    sudo nano /etc/netplan/00-*-config.yaml
    • add under "ethernets:" a new entry for your device, e.g. enp0s8 and add address to be assigned static

    image.png.3b762a790cbc649c78e0f55e7ba88340.png

    • Save the changes and execute:
    sudo netplan apply

    2. ERROR DURING MAKE PROCESS LIKE "TileAssembler"

    This might be caused due to an older compiler needed for the script. You need to downgrade the compiler. First install older compiler:

    sudo apt install gcc-10 g++-10 gcc-11 g++-11
    • Afterwards, we can configure the priority of each compiler (in this example I give prio 100 to newest version 11 and prio 80 to version 10)
    sudo update-alternatives --install /usr/bin/gcc gcc /usr/bin/gcc-11 100 --slave /usr/bin/g++ g++ /usr/bin/g++-11 --slave /usr/bin/gcov gcov /usr/bin/gcov-11
    sudo update-alternatives --install /usr/bin/gcc gcc /usr/bin/gcc-10 80 --slave /usr/bin/g++ g++ /usr/bin/g++-10 --slave /usr/bin/gcov gcov /usr/bin/gcov-10

    You can change the priority anytime with command:

    sudo update-alternatives --config gcc

    Try using version 10!

    3. WARDEN OR AIPLAYERBOT ERROR OR IF YOU ARE KICKED DIRECTLY AFTER LOGIN FROM THE GAME CLIENT

    The issue might be with wrong OpenSSL version installed (Ubuntu comes by default with OpenSSL 3.0.2, but client needs OpenSSL 1.1.1). So we have to downgrade the OpenSSL:

    • Install some additional packages:
    sudo apt install checkinstall zlib1g-dev -y
    • go to directory src and download and unzip recent OpenSSL version 1.1.1
    cd /usr/local/src/
    sudo wget https://www.openssl.org/source/openssl-1.1.1q.tar.gz
    sudo tar -xf openssl-1.1.1q.tar.gz
    cd openssl-1.1.1q
    • then install OpenSSL 1.1.1
    sudo ./config --prefix=/usr/local/ssl --openssldir=/usr/local/ssl shared zlib
    sudo make
    sudo make test
    sudo make install
    
    • Now, we create a new config file for OpenSSL 1.1.1 and add line into file: /usr/local/ssl/lib
    sudo nano /etc/ld.so.conf.d/openssl-1.1.1q.conf
    • Then, we have to reload the dynamic link and we will backup old SSL files:
    sudo ldconfig -v
    sudo mv /usr/bin/c_rehash /usr/bin/c_rehash.backup
    sudo mv /usr/bin/openssl /usr/bin/openssl.backup
    • And finally, we can change the environment variables to use the "new" OpenSSL version:
    sudo nano /etc/environment
    • Add “:/usr/local/ssl/bin“ to the end of the PATH variable. Save changes.
    • Reload the environment:
    source /etc/environment

    You can check if changes on $PATH have been applied with:

    echo $PATH

    and, if new OpenSSL is used:

    openssl version -a

    3.1 If Login still failes due to Warden or AI PlayerBot after downgrade of OpenSSL, you maybe have to disable it.

    Just change the mangosd.conf under "~/mangos/zero/etc/" accordingly and set WARDEN SUPPORT to 0. And disable AI PlayerBot if needed.

    4. FAILED TO ATTACH THE NETWORK IN VIRTUALBOX

    Sometimes after a windows update, it might happen that network can't be attached, while starting Virtual Machine. An error like this might pop-up:

    Quote

    Failed to open/create the internal network 'HostInterfaceNetworking-VirtualBox Host-Only Ethernet Adapter' (VERR_INTNET_FLT_IF_NOT_FOUND).
    Failed to attach the network LUN (VERR_INTNET_FLT_IF_NOT_FOUND).
    Fehlercode:E_FAIL (0x80004005)
    Komponente:ConsoleWrap
    Interface:IConsole {872da645-4a9b-1727-bee2-5585105b9eed}

    Then try to deactivate and activate the ethernet adapter under windows.

    image.png.e58b85b02791f3ec50bfb21e416928fd.png

    Edited by Aviscall01
    • Like 1
    Link to comment
    Share on other sites

    Hello,

    I've managed to install the server on Ubuntu 22.04, thanks for all.

    I have a strange behaviour : when i enter bash wowadmin.sh wmonitor, it tells me There is no screen to be resumed matching mangosd. I have tried screen -r mangosd but it is same issue.

    So i can't create account. And with default credentials i'm disconnected from server.

    Maybe i have done something wrong. Any help would be appreciated.

    That's not a urgent request. 

    Thanks again

    • Like 1
    Link to comment
    Share on other sites

    Fix build issue


    sudo apt install gcc-12 g++-12

    sudo update-alternatives --install /usr/bin/gcc gcc /usr/bin/gcc-12 12

    sudo update-alternatives --install /usr/bin/g++ g++ /usr/bin/g++-12 12

    • Like 1
    Link to comment
    Share on other sites

    6 minutes ago, Fyre said:

    嗨西博!当你拉取服务器时,你是否使用了“--recursive”标志?
    `git 克隆https://github.com/mangoszero/server.git --recursive`


    Yes, I used the -- recursive flag, but the warehouse I am using here is Mangostwo, so Mangostwo does not have a bot project file. During the construction process, I adjusted - DPLAYERBOTS=1 to - DPLAYERBOTS=0, which is equivalent to not enabling robots. I don't know if it's correct, but there were no errors in building the build file and Cmake was also available_ Install file,

    Link to comment
    Share on other sites

    Ah okay. With Mangostwo, you don't need to specify anything in regards to Playerbots since it's by default disabled since it does not have playerbots.

    But your second screenshot looks good.

    Link to comment
    Share on other sites

    4 minutes ago, Fyre said:

    啊好吧。使用 Mangostwo,您无需指定有关 Playerbots 的任何内容,因为它默认处于禁用状态,因为它没有 Playerbots。

    但你的第二张截图看起来不错。

    Yes, thank you for your guidance. After comparing the zero and two files, I found that there are some differences between the two versions. Therefore, I understand that zero is used to build tests, so there will be robot settings. In short, thank you for your help

    Link to comment
    Share on other sites

    image.png.01c381810a6da2189fa98a3b7519cfcc.png

    hello... i need help on this error... i could not make the mangosd running because of this error.

    i am trying to run mangos one on linux.

    i extract the map using windows tools i build using easy tools. then i extract the map from this client https://wowdl.net/client/World-of-Warcraft-2.4.3.8606-enUS

    thank you

    Edited by vedacool
    add more context
    Link to comment
    Share on other sites

    6 hours ago, vedacool said:

    image.png.01c381810a6da2189fa98a3b7519cfcc.png

    hello... i need help on this error... i could not make the mangosd running because of this error.

    i am trying to run mangos one on linux.

    i extract the map using windows tools i build using easy tools. then i extract the map from this client https://wowdl.net/client/World-of-Warcraft-2.4.3.8606-enUS

    thank you

    Hello!

    Take a look at your mangosd.conf, specifically the line: DataDir.

    Make sure that the path for that configuration variable matches where your extracted data (maps, vmaps, mmaps, DBC) is.

    Link to comment
    Share on other sites

    i think the setting is already correct.

    image.png.6d007356d2077b816816a4a625a82b3b.png

    and here is the error again

    image.png.807303a30cb005a60c74f2f03a8acab1.png

    here is the actual folder content.

    image.png.3c7ce7b8ec279a82e629af918187e7f7.png

    and i discover, i dont have a file name 5301243.map. so it is a must to have that file?
    image.png.66b39a957f333204abca7f3bcc0df8ef.png

    thank you for helping...

    Link to comment
    Share on other sites

    1 hour ago, jlb said:

    Could not find configuration file ../etc/mangosd.conf.

    Hi jib,

    Have you taken the mangosd.conf.dist in your "install" directory after the project has been built, and moved it to ../etc/ and renamed it to mangosd.conf? (i.e. mangsod.conf.dist --> ../etc/realmd.conf)

    The same thing applies to realmd.conf.dist --> ../etc/realmd.conf

    (of course the ../etc/ pathway needs to be correct for your setup. Or when you execute your mangosd/realmd, you can use the -c flag to indicate the conf location: e.g. /opt/wow/mangosd -c /opt/wow/mangosd.conf)

    Link to comment
    Share on other sites

    57 分钟前 Fyre 说道:

    嗨,吉布,

    您是否在项目构建后将“安装”目录中的 mangosd.conf.dist 移至 ../etc/ 并将其重命名为 mangosd.conf ?(即 mangsod.conf.dist --> ../etc/ realmd.conf)

    同样的事情也适用于realmd.conf.dist --> ../etc/realmd.conf

    (当然,../etc/路径需要适合您的设置。或者当您执行mangosd/realmd时,您可以使用-c标志来指示conf位置:例如/opt/wow/mangosd -c /选择/wow/mangosd .conf)

    非常感谢。这个问题已经解决了。

    Edited by jlb
    Is there any MangosThree compilation process?
    Link to comment
    Share on other sites

    make[2]: *** [src/game/CMakeFiles/vmap2.dir/build.make:118:src/game/CMakeFiles/vmap2.dir/vmap/TileAssembler.cpp.o] 错误 1
    make[1]: *** [CMakeFiles/Makefile2:802:src/game/CMakeFiles/vmap2.dir/all] 错误 2
     

    Link to comment
    Share on other sites

    This is the way ->


    3.2 To configure the database, get at first your IP address by executing the command:

    ifconfig

    Note down your IP and open MariaDB again:

    mysql -u mangos -p<password>

    You can check the realmlist with the following SQL, note down the proper ID of the server you want to configure:

    use mangos_auth;
    
    select * from realmlist;

    Update the realmlist with proper name and IP address, use the right ID:

    UPDATE realmlist SET name = “<Your Server-Name>” WHERE id = <ID>;
    UPDATE realmlist SET address = “<Server-IP address>” WHERE id = <ID>;
    Link to comment
    Share on other sites

    On 7/7/2023 at 5:29 PM, dhist said:

    Anyone has managed to run this config inside a docker container?

    Almost

    Though I forked a github repo from 4 years ago and reworked some stuff. dabatase runs inside a single container, Realmd runs inside a single container, and world also has it's own container.  Using that for a kubernetes deployment. DB and Realmd are working fine, worldserver at the moment is crashing with an error i have to troubleshoot

    Edited by xFreeway
    Link to comment
    Share on other sites


    Create an account or sign in to comment

    You need to be a member in order to leave a comment

    Create an account

    Sign up for a new account in our community. It's easy!

    Register a new account

    Sign in

    Already have an account? Sign in here.

    Sign In Now

×
×
  • Create New...

Important Information

We have placed cookies on your device to help make this website better. You can adjust your cookie settings, otherwise we'll assume you're okay to continue. Privacy Policy Terms of Use