Leaderboard


Popular Content
Showing content with the highest reputation since 03/06/15 in Wiki Article Comments
-
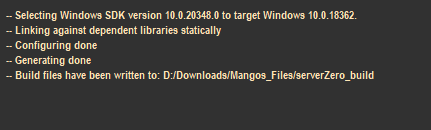
navigate to the folder D:/Downloads/Mangos_Files/serverZero_build and then open the file MANGOS.sln with Visual Studio, then build the solution3 points
-
How to fix bugs? This one is easy! Take up knitting instead. Your sanity will thank you. Still, it's a well-written guide. I give it 10/10.3 points
-
the _install folder is empty, and the easybuild build project thing went very quick. it opens visual studio, but I don't know what to do there.
 2 points
 -
Yes this has been corrected.2 points
-
to fix your issue @Calytras run locate liblua52.so copy (not move) that file to /usr/lib make sure the datadir is set properly too.1 point
-
@Pysis you are absolutely correct, i didnt realize that until you mentioned it and went to check the github repo that i took the files to compile the first time, i had the CMangos before and now i took the files from here, so its not a downgraded version i just never realized that due to the similarity of the names and the icons of Mangos looked old-school styled when compared to the CMangos so i thats why i thought that. lol1 point
-
@Conner Reid Can you provide the text of the error messages, perhaps a screenshot.1 point
-
@BitWhiz I personally recommend MariaDB (Thrown mysql in the recycle bin). Version 10,x is fine1 point
-
Point 3.2: before use select * from realmlist; You need to select the Database; mangos_auth; otherwise you will get an error because no database was selected.1 point
-
Fix build issue sudo apt install gcc-12 g++-12 sudo update-alternatives --install /usr/bin/gcc gcc /usr/bin/gcc-12 12 sudo update-alternatives --install /usr/bin/g++ g++ /usr/bin/g++-12 121 point
-
Hello, I've managed to install the server on Ubuntu 22.04, thanks for all. I have a strange behaviour : when i enter bash wowadmin.sh wmonitor, it tells me There is no screen to be resumed matching mangosd. I have tried screen -r mangosd but it is same issue. So i can't create account. And with default credentials i'm disconnected from server. Maybe i have done something wrong. Any help would be appreciated. That's not a urgent request. Thanks again1 point
-
For working with each of the formats: BLP: https://github.com/PatrickCyr/BLPConverter/issues/1#issue-1585162886 MPQ:1 point
-
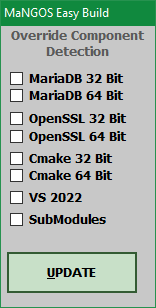
@liuyang2708 mysql libraries need to be installed rather than just the service to build mangos. But i'm going to assume you have done this. With this release of easybuild I added some bypass options. 1) On the main screen of Easybuild, click the D button 2) Click the MariaDB 32/64 installation you have (mysql is deprecated, but this will bypass it) 3) Click 'UPDATE' 4) The 'Build Options' Button should appear 5) If you get errors when attempting to build, then it's cmake can't find you mysql either.
 1 point
 -
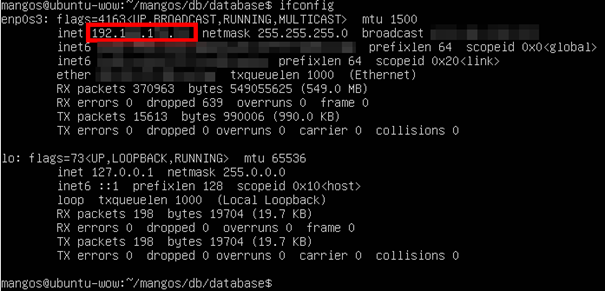
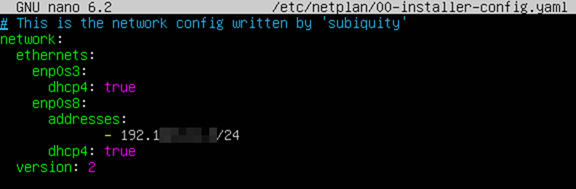
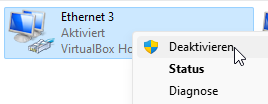
KNOWN ISSUES Nothing is perfect, so, sometimes some errors can occure. I collected my errors I was facing during running the current version of Mangos Zero in Ubuntu 22.04. _______________________________________________________________________________________________________________________________ 1. NO IP ASSIGNED TO MY INTERFACE FROM (HOST-ONLY ADAPTER IN VIRTUAL BOX) If you just see the Host-Obly Adapter, while executing the following command, but only IPv6 or no IP is assigned: ifconfig -a Try to set a static Ip out of the range of your Host-Only virtual network from VirtualBox: Edit the netplan sudo nano /etc/netplan/00-*-config.yaml add under "ethernets:" a new entry for your device, e.g. enp0s8 and add address to be assigned static Save the changes and execute: sudo netplan apply 2. ERROR DURING MAKE PROCESS LIKE "TileAssembler" This might be caused due to an older compiler needed for the script. You need to downgrade the compiler. First install older compiler: sudo apt install gcc-10 g++-10 gcc-11 g++-11 Afterwards, we can configure the priority of each compiler (in this example I give prio 100 to newest version 11 and prio 80 to version 10) sudo update-alternatives --install /usr/bin/gcc gcc /usr/bin/gcc-11 100 --slave /usr/bin/g++ g++ /usr/bin/g++-11 --slave /usr/bin/gcov gcov /usr/bin/gcov-11 sudo update-alternatives --install /usr/bin/gcc gcc /usr/bin/gcc-10 80 --slave /usr/bin/g++ g++ /usr/bin/g++-10 --slave /usr/bin/gcov gcov /usr/bin/gcov-10 You can change the priority anytime with command: sudo update-alternatives --config gcc Try using version 10! 3. WARDEN OR AIPLAYERBOT ERROR OR IF YOU ARE KICKED DIRECTLY AFTER LOGIN FROM THE GAME CLIENT The issue might be with wrong OpenSSL version installed (Ubuntu comes by default with OpenSSL 3.0.2, but client needs OpenSSL 1.1.1). So we have to downgrade the OpenSSL: Install some additional packages: sudo apt install checkinstall zlib1g-dev -y go to directory src and download and unzip recent OpenSSL version 1.1.1 cd /usr/local/src/ sudo wget https://www.openssl.org/source/openssl-1.1.1q.tar.gz sudo tar -xf openssl-1.1.1q.tar.gz cd openssl-1.1.1q then install OpenSSL 1.1.1 sudo ./config --prefix=/usr/local/ssl --openssldir=/usr/local/ssl shared zlib sudo make sudo make test sudo make install Now, we create a new config file for OpenSSL 1.1.1 and add line into file: /usr/local/ssl/lib sudo nano /etc/ld.so.conf.d/openssl-1.1.1q.conf Then, we have to reload the dynamic link and we will backup old SSL files: sudo ldconfig -v sudo mv /usr/bin/c_rehash /usr/bin/c_rehash.backup sudo mv /usr/bin/openssl /usr/bin/openssl.backup And finally, we can change the environment variables to use the "new" OpenSSL version: sudo nano /etc/environment Add “:/usr/local/ssl/bin“ to the end of the PATH variable. Save changes. Reload the environment: source /etc/environment You can check if changes on $PATH have been applied with: echo $PATH and, if new OpenSSL is used: openssl version -a 3.1 If Login still failes due to Warden or AI PlayerBot after downgrade of OpenSSL, you maybe have to disable it. Just change the mangosd.conf under "~/mangos/zero/etc/" accordingly and set WARDEN SUPPORT to 0. And disable AI PlayerBot if needed. 4. FAILED TO ATTACH THE NETWORK IN VIRTUALBOX Sometimes after a windows update, it might happen that network can't be attached, while starting Virtual Machine. An error like this might pop-up: Then try to deactivate and activate the ethernet adapter under windows.
 1 point
 -
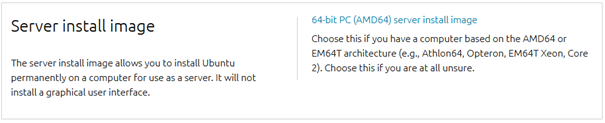
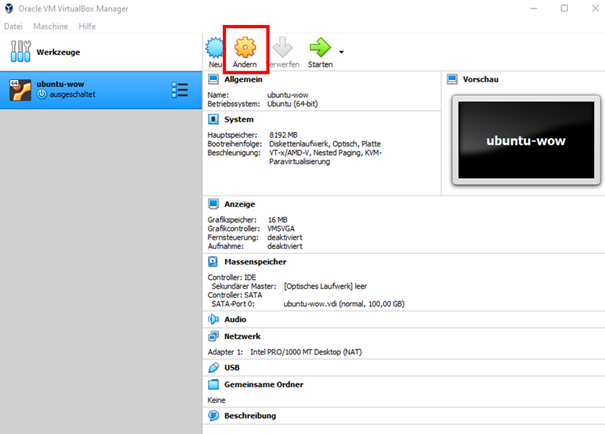
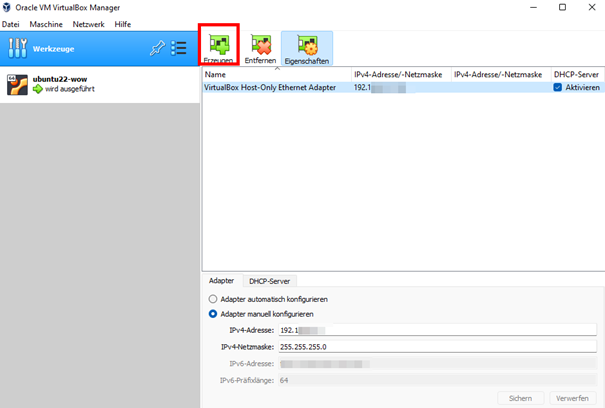
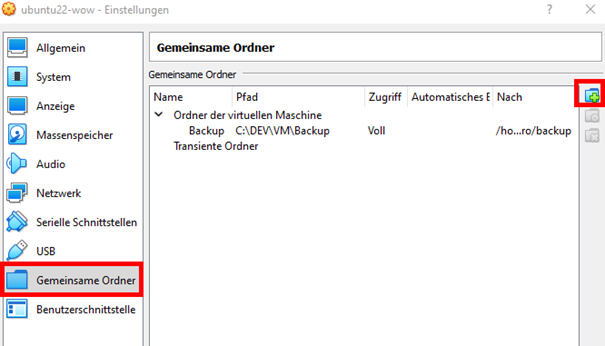
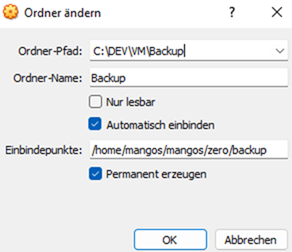
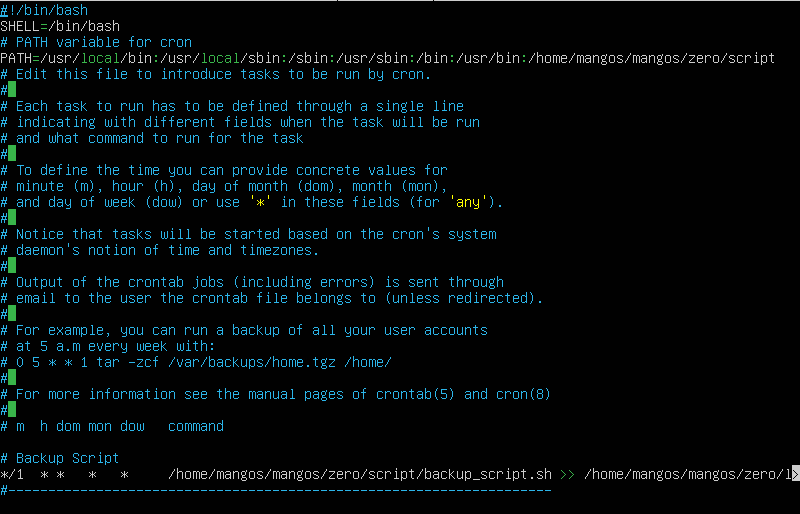
ADDON 1. HOWTO INSTALL UBUNTU 22.04 ON WINDOWS IN VIRTUALBOX: If you would like to run your server in a virtual box, you can install VirtualBox from Oracle on your PC. Here is a guide and additional settings you can use to make life easier. _______________________________________________________________________________________________________________________________ 1. prepare folder structure create folders D:/DEV/VM/Ubuntu D:/DEV/Software (download all needed software here) D:/DEV/Programs D:/DEV/GIT (if you are interesste in assisting the community in development) Download software VirtualBox: https://www.virtualbox.org/ Install software by follwoing the installer instructions, you can install it to Folder: D:/DEV/Programs/VirtualBox Accept all options After installation start VirtualBox 2. Download Ubuntu Server Image Download the server image from: http://de.archive.ubuntu.com/ubuntu-releases/jammy/ select "server install image", not the desktop one 3. Create new server Open VirtualBox and "Create" new server Give your server a nice name, like: ubuntu-wow select a path for the virtual machine, e.g. D:/DEV/VM/Ubuntu select type Linux and Version Ubuntu (64-bit) Afterwards you have to reserve some RAM memory for your machine (you can change it later, if the machine is shut down). I would recommend 4 GB or 4096 MB. In next step you are requested to create a virtual drive. select "create hard drive" and click on "create" select VDI and click on "Next" select "dynamic allocation" (this will just use the space from your PC, if really needed.) select the maximum size you would like to use, I recommend 40 GB for one server. If you plan to install others in parallel, then assign more space. After creation, click on "Edit" You can change settings. I recommend to set CPUs to minimum 2 or more. 4. Start VM You will be requested to select the ISO file for the installer. Select the ISO file from Ubuntu we downlaoded just before. Maybe you have to "Add" the ISO medium first. If you selected the file, click "Start" Follwo the instructions on the screen. Usually you can just go through the installer and accept all default values. You will be requested to insert YourName, Server Name and credentials for your user (e.g. mangos and >password>) After clicking on "Done" he installer will run, then you can "Reboot Now" the server and login with your user "mangos" 5. Usually VirtualBox is creating by default an "Host-Only Adapter", if not you can add it and activate DHCP-Server: Afterwards restart the VM again. Then you should get an IP from your new virtual network. 2. HOWTO ACCESS SERVER WITH SFTP: 1. You can access your VM via sFTP to upload data, like gamedata: Open the VM and login with "Mangos", install the sFTP server: sudo apt-get install vsftpd Configure the follwoing changes into sFTP: sudo nano /etc/vsftpd.conf change: listen=YES uncomment: write_enable=YES if you want, add root rights to gamedata folder by adding the line: local_root=/home/mangos/mangos/zero/gamedata/ Restart sFTP: service vsftpd restart 2. Now you can connect to your VM wih any sFTP client, e.g. like WinSCP. 3. HOWTO ACCESS DB FROM PC: If you want to access your DB on the server from your PC, you can use HeidiSQL on your client PC to access the database. To do so, you have to configure the DB to listen to external calls and you maybe need an additional user. 1. Edit mariadb.conf sudo nano /etc/mysql/mariadb.conf.d/50-server.cnf comment out the line: #bind-address=127.0.0.1 otherwise your DB will just listen to the localhost on 127.0.0.1 2. create new remote user in DB: mysql -u mangos -p<password> then execute SQLs: GRANT all privileges ON *.* TO ‘remoteMangos’@’xxx.xxx.xxx.%’ IDENTIFIED BY ‘<password>’ WITH GRANT OPTION; replace IP with your client IP (or if you use Host-Only Adapter with lowest IP from virtual network). 3. Login with HeidiSQL and user to your DB on the Server. 4. HOWTO BACKUP YOUR DB TO HOST: 1. Create a shared folder to save backup file on your host and not within the VM, if it crashes you can rebuild your DB with such backup. Therefor open VirtualBox and select "Edit" for the VM. 2. Select Shared Folder and click on "Add" icon: 3. Set the path on host and on VM to be added (folder shouldn't exists in VM). You can make it permanent and attach automatically: 4. Reboot the VM or start it and folder should appear. For reboot just execute the command in VM: reboot 4.1 If folder is not added you can mount it manually by executing: sudo mount -t vboxsf <FolderName in VBox: Backup> <path where to mount it> 4.2 If folder is not automatically mounted on reboot, you can also edit the fstab. sudo nano /etc/fstab Just add the follwoing line at the end of the file: Now, it should work after reboot. 5. To create a cronjob to automatically backup your DB, create a folder to store your script and edit scipt file: mkdir /home/mangos/mangos/zero/script nano /home/mangos/mangos/zero/script/backup_script.sh 6. Insert backup script into file, you can edit it if needed, accordingly to your folder structure, but it should work, if you followed instructions above: The script will create a dump of your DBs and zip them, afterwards it will copy data to backup folder, which is accessible by your host system. Also after 5 days the old file will be deleted. Maybe you have to install zip on your system: sudo apt install zip Script: 7. Save script and make it executable with command: chmod a+x /home/mangos/mangos/zero/script/backup_script.sh 8. Now, we can create a crontab for your user mangos: cd ~ && crontab -e 9. If no crontab for user exists, you will be asked to select the default editor, you can select nano 10. Then you can add the entry to start our script: Add the SHELL and PATH variable for crontab and the call for our script (the example will create a backup every hour and writes a log file for it per day): * */1 * * * /home/mangos/mangos/zero/script/backup_script.sh >> /home/mangos/mangos/zero/logs/backup_`date +\%Y-\%m-\%d`.log 2>&1 NOTE: At the end you always have to add a comment line or an empty line with carriage return. 11. Save the crontab to file /home/mangos/.crontab-mangos 12. Usually, if you edit the crontab with crontab -e, it will automatically register your user crontab, if not you can register the file manually by executing: crontab -u mangos /home/mangos/.crontab-mangos Done, you should find every hour an updated backup file on your host in the Backup folder.


 1 point
 -
Although this should be for Cata, I will update the Races Enum in the docs1 point
-
If your machine has less than 4G of ram, it will fail extracting vmap. I changed to a 8GB aws instance, it worked.1 point
-
@retikulatus You can read this article : Or even this one :1 point
-
The password is administrator. You can create an account in the database account table or via the account create command.1 point
-
Since updates, my other comments here, and my own recent success, I should report that Visual Studio 2019 Community Edition, version 16.9.2, EasyBuild version 2.2.6, and CMake version 3.18, all on Windows 10 Pro 64-bit, I was able to build a MaNGOS core successfully, thanks to the great work of others! The VS minor and patch versions were both very important to keep updated throughout, but may hopefully be less important now.1 point
-
Your configuration needs to reflect your desired goals. If you want to setup a local server then you do not need to enter an external IP address.1 point
-
Great, tool is way better than creating systemd services. Adding it to Tools is a good decision.1 point
-
Hi @Specu I agree with your proposition Let's change the script you are totally right. But I will avoid the semicolons in the name of the file. I will format date another way but I agree putting the timestamp is not so readable. I think we should also add it to the source repo in the Tools sections. I'll do it later. Elmsroth1 point
-
Hello @Elmsroth nice tool. What is really confusing is $NOW variable. In your script it looks like: NOW=$(date +"%s-%d-%m-%Y") echo $NOW 1595580505-24-07-2020 so if mangos restarts *.log shows 1595568627-24-07-2020 mangosd stopped, restarting! More human readable would be: NOW=$(date +"%T-%d-%m-%Y") echo $NOW 10:53:48-24-07-20201 point
-
Can anyone send me a link to download Version 14? I can't find one and the official download doesn't work if you don't have a subscription. EDIT: I found one: https://download.microsoft.com/download/e/4/c/e4c393a9-8fff-441b-ad3a-3f4040317a1f/vs_community.exe1 point
-
If you have Git installed, then you have the program able to execute Linux shell scripts. Start Git console, change directory (commands "cd" and "pwd" to check) to your client directory (where wow.exe file resides) and enter "./ExtractResources.sh" without quotes. But yes, this detail must be mentioned in the guide.1 point
-
open your favourite MySQL manager app, select the mangos database and run the following query: select * from command Alternatively, type .help from ingame or help from the mangos console1 point
-
Indeed. Type: help1 point
-
account set gmlevel <name> 3 realm_id where realm_id can be: -1 (all realms) > 0 (specific realm)1 point


Contact Us
To contact us
click here
You can also email us at [email protected]
Privacy Policy | Terms & Conditions

You can also email us at [email protected]
Privacy Policy | Terms & Conditions